I rewrote Sol Trader’s bloom code last week. I originally added bloom over three years ago, and now I’m refreshing of the internals of the game, it was time to take a fresh look at it.

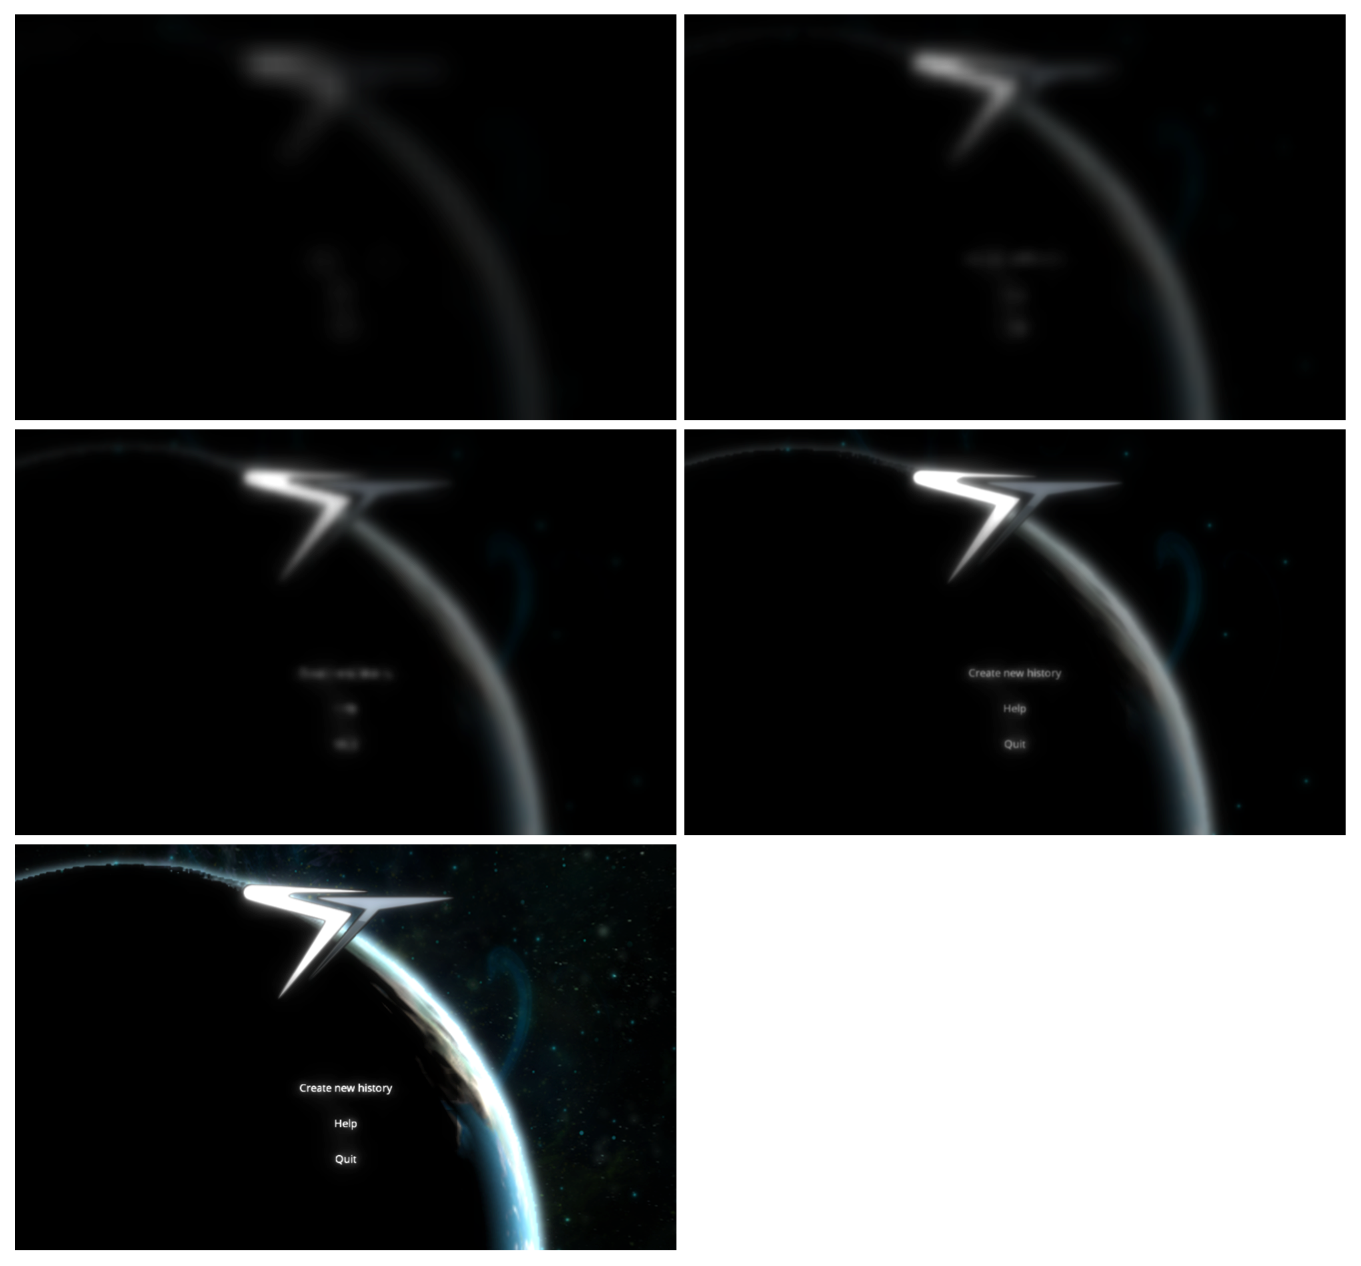
Sol Trader's new main menu, before and after bloom was reapplied
The last time that I added bloom to the engine, I had complex and clever code all over the place in order to make bloom optional. This time I’ve simplified it by turning bloom on for everyone. It makes the game look so much better, and these days the chances are small that people cannot run with it turned on.
This is how I did it, along with some example screenshots and some OpenGL sample code.
Step 1: render the source images
First, we render the original image to a temporary buffer. At the same time, we render any glowing parts of the image to a glow buffer.

Left is the original texture. Right is the glow buffer
This is how we set up OpenGL to draw into two buffers:
cpGenFramebuffers(1, &fb);
cpBindFramebuffer(CP_FRAMEBUFFER, fb);
GLenum fboBuffers[] = { GL_COLOR_ATTACHMENT0, GL_COLOR_ATTACHMENT1 };
glDrawBuffers(2, fboBuffers);
cpFramebufferTexture2D(CP_FRAMEBUFFER, GL_COLOR_ATTACHMENT0, GL_TEXTURE_2D, mainBuffer, 0);
cpFramebufferTexture2D(CP_FRAMEBUFFER, GL_COLOR_ATTACHMENT1, GL_TEXTURE_2D, glowBuffer, 0);
(The ‘cp’ prefixes are my backwards compatible wrappers for OpenGL functions - see the section below on backwards compatibility.
Once we’ve set this up, we refer to gl_FragData[0] and gl_FragData[1] in our fragment shaders. In this snippet from the GUI shader, I’m adding 9% of the GUI’s colour in to the glow buffer to give it a tiny bit of glow:
gl_FragData[0] = colour;
gl_FragData[1] = vec4(colour.rgb * 0.09, col.a);
Step 2: Copy the glow buffer to several smaller buffers

All we’re doing here is drawing the glow buffer to several other textures:
// Select the VBs for the vertices and the UVs
glBindBuffer(GL_ARRAY_BUFFER, fullscreenVertsVB);
glVertexAttribPointer(0, 2, GL_FLOAT, GL_FALSE, 0, 0);
glEnableVertexAttribArray(0);
glBindBuffer(GL_ARRAY_BUFFER, bottomLeftUvsVB);
glVertexAttribPointer(1, 2, GL_FLOAT, GL_FALSE, 0, 0);
glEnableVertexAttribArray(1);

glUseProgram(copyProgram);
glUniformMatrix4fv(matrix, 1, false, identityMatrix);
glActiveTexture(GL_TEXTURE0);
glUniform1i(texture, 0);
// Draw from the glow buffer
glBindTexture(GL_TEXTURE_2D, glowBuffer);

// Draw to the half texture
glViewport(0, 0, width / 2, height / 2);
cpFramebufferTexture2D(GL_FRAMEBUFFER_EXT, GL_COLOR_ATTACHMENT0, GL_TEXTURE_2D, halfBuffer, 0);
glDrawArrays(GL_TRIANGLE_STRIP, 0, 4);

// Draw to the quarter texture (repeat for even smaller buffers)
glViewport(0, 0, width / 4, height / 4);
cpFramebufferTexture2D(GL_FRAMEBUFFER_EXT, GL_COLOR_ATTACHMENT0, GL_TEXTURE_2D, quarterBuffer, 0);
glDrawArrays(GL_TRIANGLE_STRIP, 0, 4);
Step 3: Blur the glow buffer and smaller buffers

This is the clever bit. We use an optimised Gaussian filter process on each of the glow textures. To make it fast, we blur in two passes: horizontally to a temporary buffer, and then vertically back to the previous buffer. We also take advantage of linear texture filtering to sample between the pixels to get both colour values.
This speeds up the process massively for the GPU - it brings the number of texture lookups down from 25 to just six. See Philip Rideout’s excellent article for further explanation.
The OpenGL code is similar to the previous step:
glUseProgram(blurProgram);
glUniformMatrix4fv(matrix, 1, false, identityMatrix);
glActiveTexture(GL_TEXTURE0);
glUniform1i(texture, 0);

// Vertices and UVs are already set up from the copy step above

glViewport(0, 0, width / 2, height / 2);
glBindTexture(GL_TEXTURE_2D, halfBuffer);
glUniform2f(offset, 1.2 / width, 0);
cpFramebufferTexture2D(GL_FRAMEBUFFER_EXT, GL_COLOR_ATTACHMENT0, GL_TEXTURE_2D, halfBufferBlur, 0);
glDrawArrays(GL_TRIANGLE_STRIP, 0, 4);

glBindTexture(GL_TEXTURE_2D, halfBufferBlur);
glUniform2f(offset, 0, 1.2 / height);
cpFramebufferTexture2D(GL_FRAMEBUFFER_EXT, GL_COLOR_ATTACHMENT0, GL_TEXTURE_2D, halfBuffer, 0);
glDrawArrays(GL_TRIANGLE_STRIP, 0, 4);
Here’s the fragment shader that does the actual blur:
void main() {
  vec4 c = vec4(0);
  c += 5.0 * texture2D(texture, uv - offset);
  c += 6.0 * texture2D(texture, uv);
  c += 5.0 * texture2D(texture, uv + offset);
  gl_FragColor = c / 16.0;
}
Step 4: Combine these smaller buffers together into the result.
I’ve overdone the bloom effect on this scene so we can see the effect it has:
The OpenGL code simply sets up a new shader and selects all of the textures. The fragment shader then combines them all together:
void main() {
  vec4 vOriginal = texture2D(uTextureOriginal, uv);
  vec4 vT1 = texture2D(uTexture1, uv);
  vec4 vT2 = texture2D(uTexture2, uv);
  vec4 vT3 = texture2D(uTexture3, uv);
  vec4 vT4 = texture2D(uTexture4, uv);
  gl_FragColor = clamp(vOriginal + vT1 + vT2 + vT3 + vT4, 0.0, 1.0);
}
Making this backwards compatible
Rendering to a texture didn’t become standard in OpenGL until version 3.0 was released in 2008. Thankfully the extension has been around since about 2005, so most if not all drivers do support it in some way. I used glew and a series of macros like this one to choose between either the extension or the standardised version:
#define cpGenFramebuffers(a, b) \
  ((GLEW_VERSION_3_0 || GLEW_ARB_framebuffer_object) ? \
   glGenFramebuffers((a), (b)) : \
   glGenFramebuffersEXT((a), (b)))
Now I can use call cpGenFramebuffers and have it call the right thing for any graphics driver.
Summary
The end result looks just great, and really makes our games come alive and look that much more professional. Thanks to the rewrite, I’m able to render much brighter bloom than with my previous code. It’s important not to overuse this effect (there’s already way too much lens flare out there) but it’s amazing just how much a even a little bit of bloom lifts a scene.
Take a couple of hours and put bloom into your game engine. You’ll be glad you did.
Check out my indie game Sol Trader, an epic space action adventure. Be part of a living society you can befriend, understand and manipulate to your own ends.
Follow